MOJO REST API
MOJO is an API-first automation platform. Every operation available in the web interface — from server discovery and registration to OS deployments and firmware updates — is fully accessible through the REST API. This makes MOJO ideal for integration with automation tools like vRealize Orchestrator, Ansible, ServiceNow, Terraform, and custom scripts.
This guide covers everything you need to work with the MOJO API — authentication, interactive exploration, server lifecycle automation, firmware baseline management, and complete end-to-end workflows.
Exploring the API
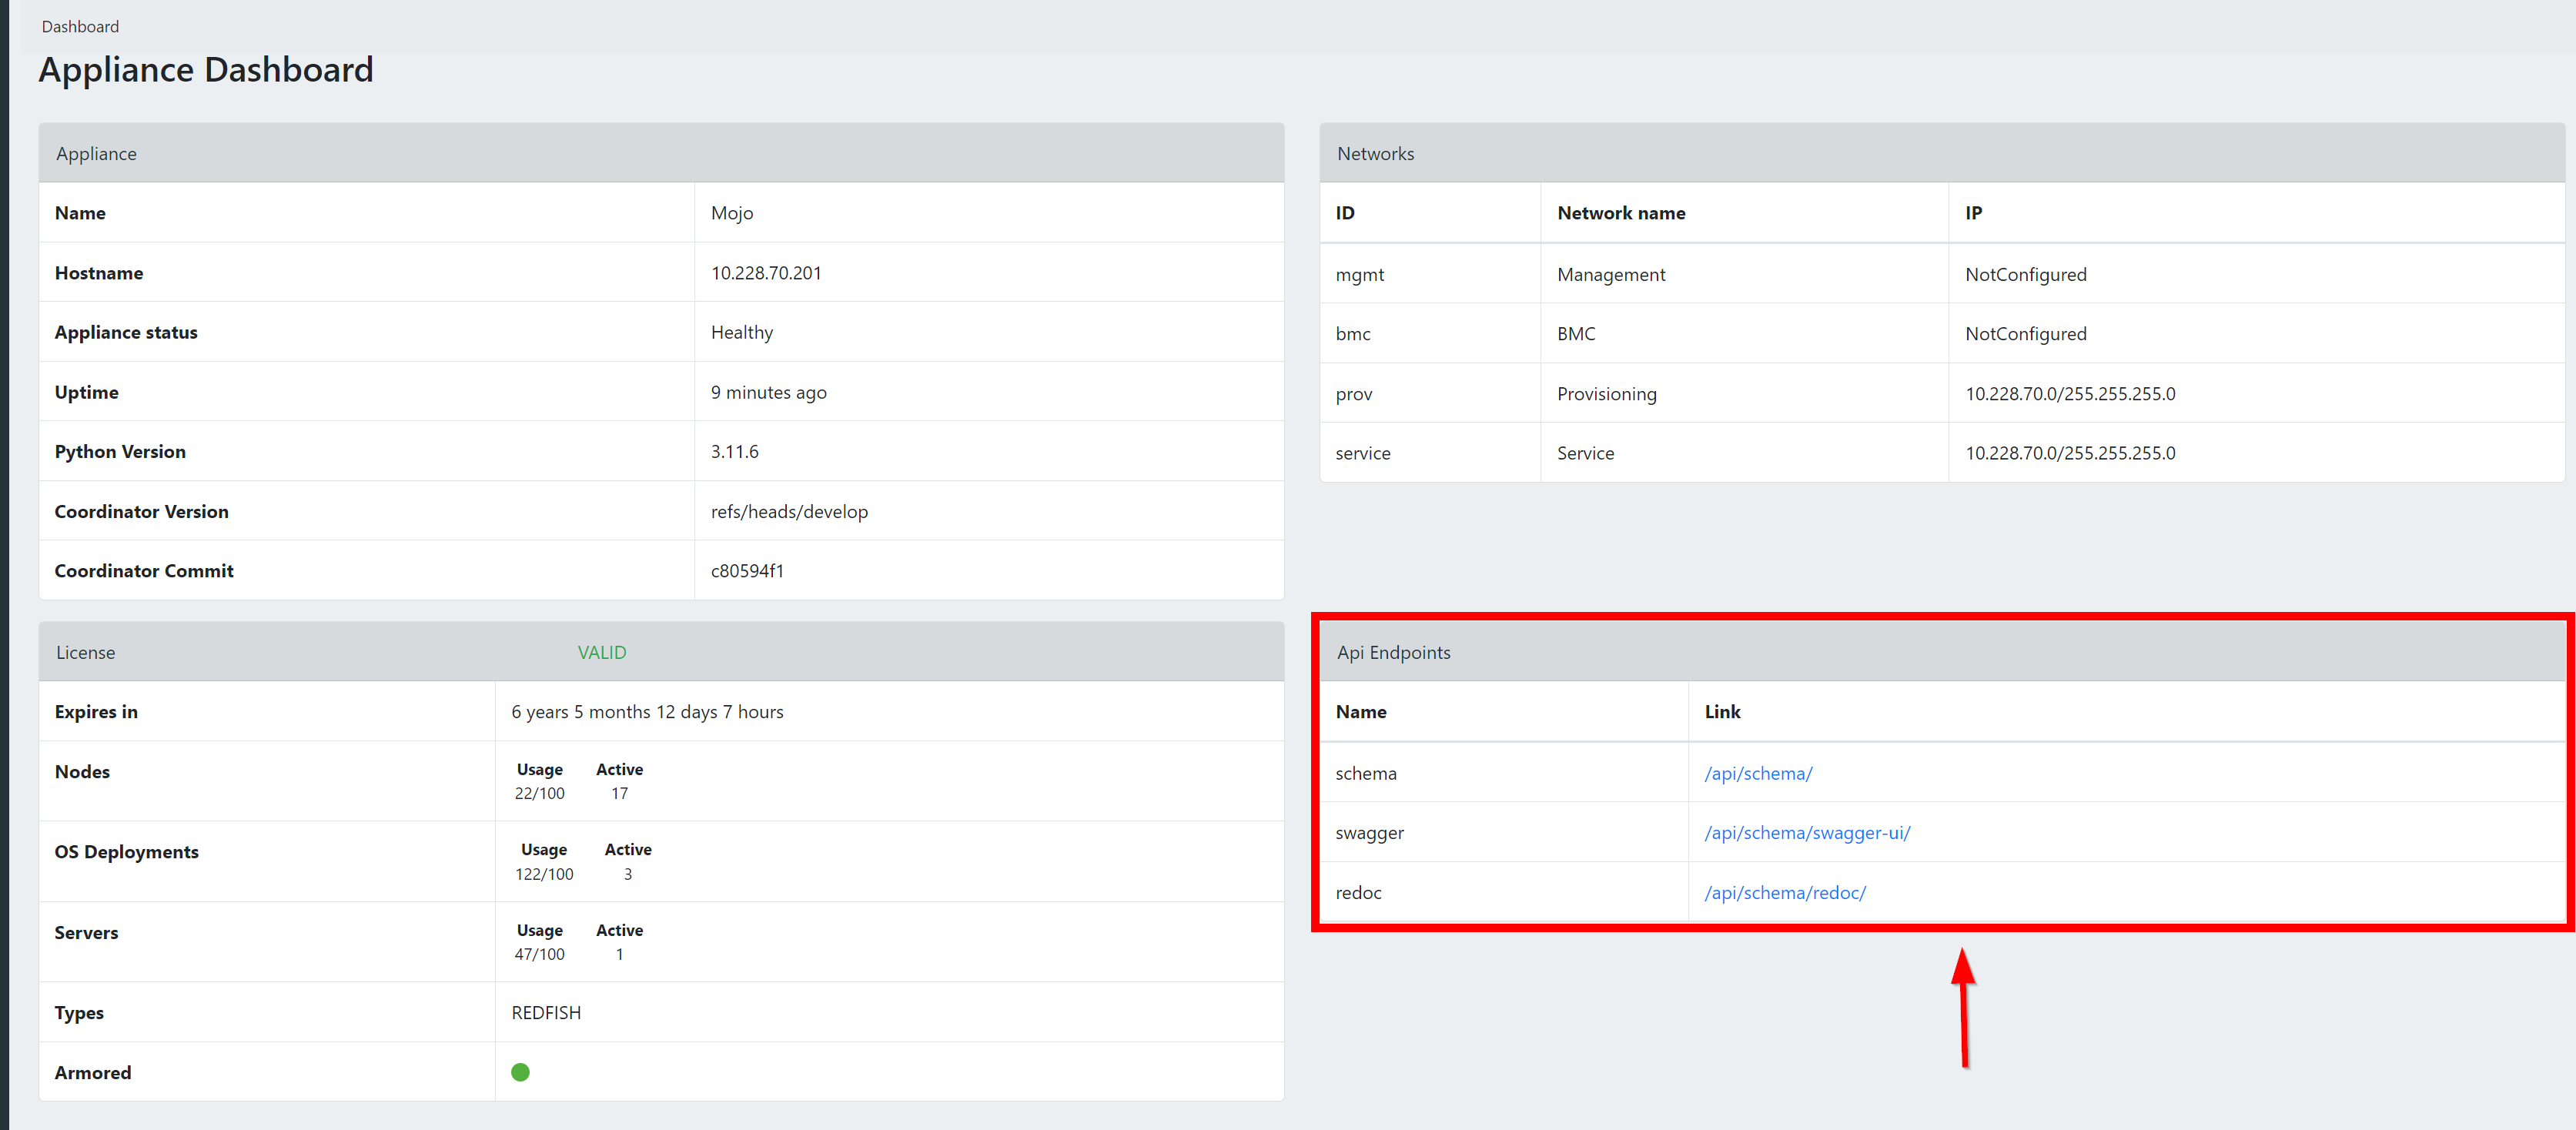
To begin using the MOJO API, log in to your MOJO instance and find the Developer API section on the dashboard. It provides three access points:
- OpenAPI Schema (
/api/schema/) — Raw access to the API schema in YAML or JSON. - Swagger UI (
/api/schema/swagger-ui/) — Interactive API testing and exploration. - Redoc (
/api/schema/redoc/) — Detailed endpoint documentation with examples.
An OpenAPI Specification is also available outside of a MOJO installation for reference and to build external tools against. You can browse and access the specifications.
API Endpoint
The API endpoint is derived from your MOJO instance's URL by adding /api/ at the end. For example:
- If your MOJO instance is located at
https://7.7.7.7, then:- Web UI URL:
https://7.7.7.7 - API Endpoint:
https://7.7.7.7/api/
- Web UI URL:
In documentation, ${MOJOHOST}/api/ is used as a placeholder for your specific API endpoint.
Authenticate in the Browser
You can authenticate directly in the Swagger UI at ${MOJOHOST}/api/schema/swagger-ui/ — click the Authorize button, enter your API access token, and test any endpoint interactively without writing any code.
Getting Started
Authentication
All API requests require an API access token. Obtain one by sending your credentials to the token endpoint:
Token Lifetime
Tokens are valid for 24 hours by default. Use the refresh endpoint at /api/token/refresh/ to obtain a new access token without re-authenticating.
Once you have a token, include it in all subsequent requests:
PUT vs PATCH: Best Practices
MOJO supports both PUT and PATCH for updating resources. We strongly recommend using PATCH wherever possible:
| Method | Behavior | When to Use |
|---|---|---|
PUT |
Full replacement — you must send the complete object. Any field you omit may be reset to its default. | Only when you intend to replace the entire resource. |
PATCH |
Partial update — send only the fields you want to change. All other fields remain untouched. | Preferred for automation. Safer, less error-prone. |
Example — Update only a server's pool assignment:
Why PATCH is better for automation
When building automation workflows, PATCH prevents accidental data loss. If the MOJO API adds new fields in a future release, a PUT request that doesn't include them could reset those fields. PATCH only touches what you explicitly send.
Filtering, Searching & Pagination
MOJO's API includes powerful filtering, search, and sorting capabilities across all list endpoints. These are essential for working efficiently with large inventories.
Text Search
Use the search query parameter to perform a text search across multiple fields at once:
# Search servers by name, model, serial number, manufacturer, SKU, or BMC URL
curl -s -k \
-H "Authorization: Bearer ${TOKEN}" \
"${MOJOHOST}/api/server/?search=PowerEdge"
# Search nodes by vendor, product, status, or URL
curl -s -k \
-H "Authorization: Bearer ${TOKEN}" \
"${MOJOHOST}/api/node/?search=dell"
# Search scan ranges by name, IP range, or status
curl -s -k \
-H "Authorization: Bearer ${TOKEN}" \
"${MOJOHOST}/api/node_discovery/scan_range/?search=Rack+1"
Search is case-insensitive and matches partial strings.
Field Filtering
Filter results by exact field values using query parameters that match field names:
# Servers in a specific pool
curl -s -k \
-H "Authorization: Bearer ${TOKEN}" \
"${MOJOHOST}/api/server/?resource_pool=1"
# Servers with a specific power state
curl -s -k \
-H "Authorization: Bearer ${TOKEN}" \
"${MOJOHOST}/api/server/?power_state=On"
# Firmware binaries filtered by type
curl -s -k \
-H "Authorization: Bearer ${TOKEN}" \
"${MOJOHOST}/api/firmware/?firmware_type=BIOS"
# OS images filtered by architecture
curl -s -k \
-H "Authorization: Bearer ${TOKEN}" \
"${MOJOHOST}/api/os/?arch=x86_64"
Discover available filters
The Swagger UI at ${MOJOHOST}/api/schema/swagger-ui/ shows all available filter fields for each endpoint. Look for the "Parameters" section on any list endpoint.
Sorting
Use the ordering query parameter to sort results. Prefix with - for descending order:
# Sort servers by name (ascending)
curl -s -k \
-H "Authorization: Bearer ${TOKEN}" \
"${MOJOHOST}/api/server/?ordering=name"
# Sort servers by manufacturer (descending)
curl -s -k \
-H "Authorization: Bearer ${TOKEN}" \
"${MOJOHOST}/api/server/?ordering=-manufacturer"
# Sort by pool name
curl -s -k \
-H "Authorization: Bearer ${TOKEN}" \
"${MOJOHOST}/api/server/?ordering=resource_pool__name"
Common sortable fields for servers: name, model, serial_number, manufacturer, sku, bios_version, power_state, resource_pool__name
Combining Filters
You can combine search, filter, and ordering parameters in a single request:
# Dell servers in pool 1, sorted by name
curl -s -k \
-H "Authorization: Bearer ${TOKEN}" \
"${MOJOHOST}/api/server/?search=Dell&resource_pool=1&ordering=name"
Pagination
List endpoints return all results by default. For large inventories, use pagination to retrieve results in manageable pages:
# Get the first 25 servers
curl -s -k \
-H "Authorization: Bearer ${TOKEN}" \
"${MOJOHOST}/api/server/?page=1&page_size=25"
Paginated responses include navigation metadata:
{
"count": 150,
"next": "https://<your-mojo>/api/server/?page=2&page_size=25",
"previous": null,
"results": [ ... ]
}
| Parameter | Description |
|---|---|
page |
Page number (starting from 1) |
page_size |
Number of results per page (max 1000) |
count |
Total number of matching results |
next |
URL for the next page (null if on last page) |
previous |
URL for the previous page (null if on first page) |
Performance tip
For large deployments with hundreds of servers, always use pagination combined with filtering. Requesting all servers without pagination works but may be slower for very large inventories.
Server Discovery and Registration
Step-by-step how-to guide
For a complete, copy-paste automation walkthrough (auth profiles, discovery, registration, pool assignment), see Automate Server Lifecycle via API.
The typical workflow for bringing new servers under MOJO management:
- Create a scan range — Define the IP range to search
- Run discovery — Scan the range for BMC/Redfish endpoints
- Check scan status — Wait for discovery to complete
- View discovered nodes — See what was found
- Register nodes — Authenticate and enroll nodes into MOJO
- Assign to a pool — Organize servers into resource pools
Step 1: Create a Scan Range
Define the network range where your server BMCs are located:
curl -s -k -X POST \
-H "Content-Type: application/json" \
-H "Authorization: Bearer ${TOKEN}" \
-d '{
"name": "Data Center Rack 1",
"ip_from": "10.0.1.1",
"ip_to": "10.0.1.50",
"ports": [443]
}' \
${MOJOHOST}/api/node_discovery/scan_range/
Note
Port 443 is the standard port for Redfish/BMC interfaces. Add additional ports if your environment uses non-standard configurations.
Step 2: Run Discovery
Start scanning across your configured scan ranges:
curl -s -k -X POST \
-H "Content-Type: application/json" \
-H "Authorization: Bearer ${TOKEN}" \
-d '{"scan_ranges": [1]}' \
${MOJOHOST}/api/node_discovery/run_scan/
Replace 1 with the ID returned when you created the scan range.
Step 3: Check Scan Status
Poll the scan range to see if discovery is complete:
The status field will show "scanning" while in progress or "ready" when complete.
Step 4: View Discovered Nodes
List all discovered nodes:
Nodes with "status": "discovered" are ready to be registered.
Step 5: Register Nodes
Register a discovered node using an authentication profile that contains the BMC credentials:
curl -s -k -X POST \
-H "Content-Type: application/json" \
-H "Authorization: Bearer ${TOKEN}" \
-d '{"auth_profile": 1}' \
${MOJOHOST}/api/node/42/register/
Replace 42 with the node ID and 1 with the authentication profile ID.
Authentication Profiles
Before registering nodes, you need an authentication profile with valid BMC credentials. See Managing Authentication Profiles below.
Step 6: Assign to a Pool
Once registered, add the server to a resource pool. See Resource Pool Management below.
Resource Pool Management
Resource pools organize your servers into logical groups with shared access controls. Pools support a hierarchy through sub-pools for fine-grained organization.
List All Pools
Each pool in the response includes:
| Field | Description |
|---|---|
id |
Pool identifier |
name |
Pool name |
description |
Pool description |
group |
The user group that controls access to this pool |
parent |
Parent pool ID (if this is a sub-pool) |
sub_pools |
List of child pools |
servers_count |
Number of servers in the pool |
switches_count |
Number of switches in the pool |
Get Pool Details
Retrieve full details for a pool, including all servers and switches:
Create a Pool
curl -s -k -X POST \
-H "Content-Type: application/json" \
-H "Authorization: Bearer ${TOKEN}" \
-d '{
"name": "Production Servers",
"description": "Production environment servers",
"group": 1
}' \
${MOJOHOST}/api/pool/
Group Assignment
The group field controls which users can see and manage the pool. Users can only access pools that belong to groups they are members of. Always assign a group to ensure proper access control.
Assign Servers to a Pool
Add one or more servers to a pool using their server IDs or node IDs:
curl -s -k -X POST \
-H "Content-Type: application/json" \
-H "Authorization: Bearer ${TOKEN}" \
-d '{"servers": [1, 2, 3]}' \
${MOJOHOST}/api/pool/1/assign_servers/
Note
- Servers must not already be assigned to another pool. If a server is already in a pool, the response will indicate which pool it belongs to.
- You can pass either Server IDs or Node (BMC) IDs — MOJO will resolve both.
Alternative: You can also assign a single server by updating it directly:
curl -s -k -X PATCH \
-H "Content-Type: application/json" \
-H "Authorization: Bearer ${TOKEN}" \
-d '{"resource_pool": 1}' \
${MOJOHOST}/api/server/42/
Remove Servers from a Pool
Remove servers from their assigned pools (servers must not be in an active deployment):
curl -s -k -X POST \
-H "Content-Type: application/json" \
-H "Authorization: Bearer ${TOKEN}" \
-d '{"servers": [1, 2]}' \
${MOJOHOST}/api/server/remove_from_pool/
Assign Switches to a Pool
curl -s -k -X POST \
-H "Content-Type: application/json" \
-H "Authorization: Bearer ${TOKEN}" \
-d '{"switches": [1, 2]}' \
${MOJOHOST}/api/pool/1/assign_switches/
Create a Sub-Pool
Organize pools hierarchically by creating sub-pools:
curl -s -k -X POST \
-H "Content-Type: application/json" \
-H "Authorization: Bearer ${TOKEN}" \
-d '{
"name": "Linux Servers",
"description": "Linux production servers"
}' \
${MOJOHOST}/api/pool/1/create_sub_pool/
Update a Pool
curl -s -k -X PUT \
-H "Content-Type: application/json" \
-H "Authorization: Bearer ${TOKEN}" \
-d '{
"name": "Updated Pool Name",
"description": "New description",
"group": 1
}' \
${MOJOHOST}/api/pool/1/
Delete a Pool
Server Inventory
List All Servers
Retrieve all registered servers with hardware details, pool assignments, and BMC information:
You can filter, search, and sort results:
# Search by name, model, serial number, manufacturer, SKU, or BMC URL
curl -s -k \
-H "Authorization: Bearer ${TOKEN}" \
"${MOJOHOST}/api/server/?search=PowerEdge"
# Filter by pool
curl -s -k \
-H "Authorization: Bearer ${TOKEN}" \
"${MOJOHOST}/api/server/?resource_pool=1"
# Sort by name
curl -s -k \
-H "Authorization: Bearer ${TOKEN}" \
"${MOJOHOST}/api/server/?ordering=name"
Get Server Details
Server Sub-Resources
Get detailed hardware information for a specific server:
# Processors
curl -s -k -H "Authorization: Bearer ${TOKEN}" \
${MOJOHOST}/api/server/42/processors/
# Ethernet interfaces
curl -s -k -H "Authorization: Bearer ${TOKEN}" \
${MOJOHOST}/api/server/42/ethernet_interfaces/
# Storage (controllers, drives, volumes)
curl -s -k -H "Authorization: Bearer ${TOKEN}" \
${MOJOHOST}/api/server/42/storages/
Firmware Inventory
List Firmware for a Server
Retrieve the full firmware inventory (BIOS, BMC, NIC firmware, storage controller firmware, etc.) for a specific server:
List Firmware Update Binaries
List all firmware update packages that have been uploaded to MOJO:
Get Firmware Binary Details
Firmware Baselines
Step-by-step how-to guide
For a practical walkthrough of creating baselines, checking compliance, and remediating servers, see Manage Firmware Baselines.
The Firmware Baseline API lets you define a desired firmware state for your servers and then check compliance and remediate drift — all through the REST API. Instead of updating firmware components one at a time, you create a baseline (a named collection of firmware binaries) and apply it to servers or entire pools in a single operation.
This is modeled after enterprise firmware management patterns (like Dell OpenManage Enterprise baselines) and follows a four-step workflow:
- Catalog — Firmware binaries already loaded into MOJO (BIOS, BMC, RAID controller, NIC, etc.)
- Baseline — A named collection grouping specific firmware versions for a server model
- Compliance — Compare each server's installed firmware against the baseline
- Remediation — Automatically update all non-compliant components in one request
When to use baselines vs. individual firmware updates
Use the Firmware Baseline API when you need to manage multiple firmware components across multiple servers — for example, ensuring all Dell R750s in a pool are running the same BIOS, iDRAC, and PERC versions. Use the individual firmware update endpoint when you need to push a single firmware binary to specific servers.
Baseline CRUD Endpoints
Base URL
List All Baselines
Returns all firmware baselines, ordered by most recently created.
Query Parameters:
| Parameter | Type | Description |
|---|---|---|
name |
string | Filter by exact baseline name |
search |
string | Search across name, description |
Response: 200 OK
[
{
"id": 1,
"firmware_binaries": [504, 505, 506],
"created_by": 1,
"name": "Dell R750 Production Q1 2026",
"description": "Production firmware baseline for Dell PowerEdge R750. Includes BIOS 1.12.2, iDRAC 6.10.80.00, and PERC H755 25.5.9.0001.",
"created_at": "2026-01-11T11:13:05.109631Z",
"updated_at": "2026-01-11T11:13:05.109641Z"
},
{
"id": 2,
"firmware_binaries": [507, 508],
"created_by": 1,
"name": "HPE DL380 Gen10 Plus",
"description": "Production firmware baseline for HPE ProLiant DL380 Gen10 Plus.",
"created_at": "2026-01-11T11:13:05.116218Z",
"updated_at": "2026-01-11T11:13:05.116226Z"
}
]
Create a Baseline
curl -s -k -X POST \
-H "Content-Type: application/json" \
-H "Authorization: Bearer ${TOKEN}" \
-d '{
"name": "Dell R750 Production Q1 2026",
"description": "BIOS 1.12.2, iDRAC 6.10.80.00, PERC H755 25.5.9.0001",
"firmware_binaries": [504, 505, 506]
}' \
${MOJOHOST}/api/firmware_baseline/
Request Fields:
| Field | Type | Required | Description |
|---|---|---|---|
name |
string | yes | Unique baseline name (max 256 characters) |
description |
string | no | Free-text description |
firmware_binaries |
int[] | no | List of FirmwareBinary IDs to include |
The created_by field is automatically set to the authenticated user.
Response: 201 Created
{
"id": 4,
"firmware_binaries": [504, 505, 506],
"created_by": 1,
"name": "Dell R750 Production Q1 2026",
"description": "BIOS 1.12.2, iDRAC 6.10.80.00, PERC H755 25.5.9.0001",
"created_at": "2026-01-11T15:00:00.000000Z",
"updated_at": "2026-01-11T15:00:00.000000Z"
}
Unique Names
Baseline names must be unique. Attempting to create a baseline with a duplicate name returns 400 Bad Request.
Get a Baseline
Response: 200 OK — Same schema as the list response (single object).
Returns 404 Not Found if the baseline does not exist.
Update a Baseline
Use PATCH to update specific fields without affecting others:
Firmware binaries are replaced, not appended
Setting firmware_binaries replaces the entire set. To add a new firmware binary, include all existing IDs plus the new one.
Response: 200 OK
Delete a Baseline
Response: 204 No Content
This does not delete the underlying firmware binary objects — only the baseline grouping.
Compliance Checking
The compliance endpoint compares servers' currently installed firmware against the versions defined in a baseline, returning per-server, per-component status.
Check Compliance
Query Parameters:
| Parameter | Type | Required | Description |
|---|---|---|---|
server |
int | no | Check a specific server by ID |
pool |
int | no | Check all servers in a resource pool |
| (none) | — | — | If neither is specified, checks all compatible servers |
Compatible Servers
When no server or pool filter is specified, MOJO automatically finds all servers whose manufacturer and model match at least one firmware binary in the baseline. This means a "Dell R750" baseline will only check Dell R750 servers.
Response: 200 OK
{
"baseline_id": 1,
"baseline_name": "Dell R750 Production Q1 2026",
"servers": [
{
"server_id": 42,
"server_name": "r750-node01",
"manufacturer": "Dell",
"model": "PowerEdge R750",
"overall_status": "non_compliant",
"components": [
{
"firmware_binary_id": 504,
"firmware_type": "bios",
"baseline_version": "1.12.2",
"current_version": "1.10.0",
"status": "non_compliant"
},
{
"firmware_binary_id": 505,
"firmware_type": "bmc",
"baseline_version": "6.10.80.00",
"current_version": "6.10.80.00",
"status": "compliant"
},
{
"firmware_binary_id": 506,
"firmware_type": "storage_controller",
"baseline_version": "25.5.9.0001",
"current_version": null,
"status": "unknown"
}
]
}
],
"summary": {
"total_servers": 1,
"compliant": 0,
"non_compliant": 1,
"unknown": 0,
"not_applicable": 0
}
}
Error Responses:
| Code | Condition |
|---|---|
400 |
Invalid server or pool ID format |
404 |
Server or pool does not exist |
Compliance Statuses
Each component in the compliance response has a status field:
| Status | Meaning |
|---|---|
compliant |
Installed firmware version matches the baseline version |
non_compliant |
Installed firmware version differs from the baseline version |
unknown |
No matching firmware found for this component type on the server |
not_applicable |
The firmware binary is not compatible with this server's manufacturer/model |
Overall Status Logic:
The server's overall_status is determined by the most severe component status:
- If any component is
non_compliant→non_compliant - If none are
non_compliantbut some areunknown→unknown - If all applicable components match →
compliant - If no components apply to the server →
not_applicable
How Compliance Detection Works
The system uses different strategies depending on the firmware component type:
BIOS and BMC — Compared directly against server attributes:
- BIOS:
server.bios_version - BMC:
server.bmc.firmware_version
Other firmware types (storage controllers, LSI, service packs) — The system searches the server's installed firmware inventory using type-specific keywords matched against the firmware name and software_id fields:
| Firmware Type | Match Keywords |
|---|---|
storage_controller |
storage, raid, perc, storage controller, hba |
lsi_3108 |
lsi, 3108, megaraid, sas |
service_pack |
service pack, spp, firmware pack |
Version Comparison
All version comparisons use exact string equality. For example, "1.2.0" and "1.2" are considered different versions and will be reported as non-compliant.
Remediation
Apply a Firmware Baseline
Submit a request to update all non-compliant firmware components on target servers. This creates a multi-step workflow executed through the MOJO workflow engine.
Request Fields:
| Field | Type | Required | Description |
|---|---|---|---|
data.baseline |
int | yes | Firmware baseline ID |
data.servers |
int[] | no* | List of server IDs to remediate |
data.pool |
int | no* | Resource pool ID — targets all unprotected servers in the pool |
data.force_reinstall |
bool | no | Reinstall all firmware regardless of compliance. Default: false |
data.force_updates |
bool | no | Force update even if BMC reports current version. Default: false |
*Either servers or pool must be provided. If pool is provided and servers is omitted, all unprotected servers in the pool are targeted.
Response: 201 Created — Returns the created request object, which can be tracked through the standard request API.
Error Responses:
| Code | Condition |
|---|---|
400 |
Baseline has no firmware binaries defined |
400 |
Neither servers nor pool provided |
400 |
No unprotected servers found in the pool |
400 |
Server is not compatible with any firmware in baseline |
What Happens During Remediation
For each targeted server, the workflow engine:
- Runs a compliance check against the baseline to identify non-compliant components
- Logs current firmware versions (for audit trail)
- For each non-compliant component:
- Verifies the firmware binary is downloadable and checksum-valid
- Runs manufacturer-specific pre-steps (e.g., enter maintenance mode)
- Flashes the firmware via Redfish and waits for completion
- Runs manufacturer-specific post-steps (e.g., reboot if required)
- Logs new firmware versions (for audit trail)
All steps within a single server execute serially to respect firmware dependency ordering. Multiple servers may be processed in parallel depending on the workflow engine configuration.
If force_reinstall is true, all compatible firmware binaries are applied regardless of compliance status. Otherwise, only non-compliant components are updated.
Individual Firmware Update Endpoint
For cases where you need to update a single firmware component on one or more servers without using a baseline:
curl -s -k -X POST \
-H "Content-Type: application/json" \
-H "Authorization: Bearer ${TOKEN}" \
-d '{
"data": {
"servers": [42, 43],
"firmware": 504,
"force_reinstall": true,
"force_updates": false
}
}' \
${MOJOHOST}/api/requests/firmware_update/
| Field | Type | Required | Description |
|---|---|---|---|
data.servers |
int[] | yes | List of server IDs |
data.firmware |
int | yes | Single FirmwareBinary ID |
data.force_reinstall |
bool | no | Reinstall even if at target version. Default: true |
data.force_updates |
bool | no | Force update via BMC. Default: false |
Note
This endpoint updates one firmware component at a time. To update BIOS + BMC + PERC on a server, you would need 3 separate API calls. For multi-component updates, use the firmware baseline update endpoint instead.
End-to-End Workflow: Pool-Level Firmware Update
This walkthrough demonstrates the recommended automation workflow — the same pattern you would implement in vRealize Orchestrator, Ansible, or any custom automation.
Step 1: Authenticate
export MOJOHOST="https://<your-mojo-ip>"
export TOKEN=$(curl -s -k -X POST \
    -H "Content-Type: application/json" \
    -d '{"username": "your_user", "password": "your_pass"}' \
    ${MOJOHOST}/api/token/ | jq -r '.access')
Step 2: List Available Baselines
curl -s -k \
-H "Authorization: Bearer ${TOKEN}" \
${MOJOHOST}/api/firmware_baseline/ | jq '.[] | {id, name, description}'
Identify which baseline to apply based on the target server hardware.
Step 3: Check Compliance for a Pool
curl -s -k \
-H "Authorization: Bearer ${TOKEN}" \
"${MOJOHOST}/api/firmware_baseline/1/compliance/?pool=5" \
| jq '{summary, non_compliant_servers: [.servers[] | select(.overall_status == "non_compliant") | {server_id, server_name, overall_status}]}'
Review which servers need updates and which components are non-compliant.
Step 4: Remediate Non-Compliant Servers
curl -s -k -X POST \
-H "Content-Type: application/json" \
-H "Authorization: Bearer ${TOKEN}" \
-d '{"data": {"baseline": 1, "pool": 5}}' \
${MOJOHOST}/api/requests/firmware_baseline_update/
This submits a single request that automatically:
- Identifies all non-compliant components on each server in the pool
- Generates the multi-step firmware update workflow
- Executes updates with proper pre/post steps and dependency ordering
Step 5: Monitor Progress
Track the request status through the standard request API to monitor update progress across all servers.
One API call to update an entire pool
The firmware baseline system replaces what would otherwise require dozens of individual API calls (one per firmware component per server) with a single remediation request. For a pool of 10 servers each needing 3 firmware updates, that's 1 API call instead of 30.
Firmware Baseline Data Model
FirmwareBaseline
| Field | Type | Description |
|---|---|---|
id |
int | Auto-generated primary key |
name |
string (max 256) | Unique baseline name |
description |
string | Free-text description (optional) |
firmware_binaries |
many-to-many (FirmwareBinary) | Firmware binaries defining the desired state |
created_at |
datetime | Auto-set on creation |
updated_at |
datetime | Auto-set on update |
created_by |
foreign key (User) | User who created the baseline (nullable) |
FirmwareBinary (Reference)
Each firmware binary in a baseline represents one firmware component:
| Field | Type | Description |
|---|---|---|
id |
int | Auto-generated primary key |
type |
string | bios, bmc, storage_controller, lsi_3108, service_pack |
version |
string | Target firmware version string |
manufacturer |
string | Server manufacturer (e.g., Dell, HPE, Supermicro) |
models |
list | Compatible server models (e.g., ["PowerEdge R750"]) |
location |
string | URL or path to the firmware binary file |
Managing Authentication Profiles
Authentication profiles store BMC credentials used when registering nodes. You can organize credentials by data center, rack, vendor, or any grouping that fits your environment.
List Profiles
Create a Profile
curl -s -k -X POST \
-H "Content-Type: application/json" \
-H "Authorization: Bearer ${TOKEN}" \
-d '{
"node_classification": "Dell Servers - DC1",
"bmc": "redfish"
}' \
${MOJOHOST}/api/node_discovery/auth_profile/
Add Credentials to a Profile
curl -s -k -X POST \
-H "Content-Type: application/json" \
-H "Authorization: Bearer ${TOKEN}" \
-d '{
"username": "admin",
"password": "your_bmc_password"
}' \
${MOJOHOST}/api/node_discovery/auth_profile/1/credentials/
You can add multiple credential pairs to a single profile. During registration, MOJO will try each credential until one succeeds.
List Credentials for a Profile
curl -s -k \
-H "Authorization: Bearer ${TOKEN}" \
${MOJOHOST}/api/node_discovery/auth_profile/1/credentials/
Client Libraries & SDK Generation
MOJO publishes a full OpenAPI 3.0 schema at every installation, making it easy to generate client libraries in any language for your automation platform.
Downloading the OpenAPI Schema
# Download the schema in YAML format
curl -s -k \
-H "Authorization: Bearer ${TOKEN}" \
${MOJOHOST}/api/schema/ -o mojo-openapi.yaml
# Or in JSON format
curl -s -k \
-H "Authorization: Bearer ${TOKEN}" \
-H "Accept: application/json" \
${MOJOHOST}/api/schema/ -o mojo-openapi.json
An OpenAPI Specification is also available outside of a MOJO installation for reference. You can browse and download the specifications.
Generating Client Libraries
Use OpenAPI Generator to create a typed client library in your preferred language:
vRealize Orchestrator (vRO)
For VMware vRO integrations, download the OpenAPI schema and import it as a REST endpoint in vRO. The schema provides all the type information vRO needs to generate typed workflow inputs and outputs.
Performance Tips
When automating against MOJO instances that manage hundreds or thousands of servers, these tips will help keep your integrations fast and efficient.
Request Only What You Need
- Use pagination for list endpoints:
?page=1&page_size=50instead of fetching all results at once - Use filters to narrow results at the server:
?resource_pool=1&power_state=Onis faster than fetching everything and filtering client-side - Use search for text lookups:
?search=PowerEdgelets the server do the work
Token Management
- Reuse tokens — API access tokens are valid for 24 hours. Cache and reuse them instead of requesting a new token for every API call
- Use token refresh — Call
/api/token/refresh/with your current token before it expires, rather than re-authenticating with username/password
# Refresh an existing token
curl -s -k -X POST \
-H "Content-Type: application/json" \
-d '{"refresh": "your_refresh_token"}' \
${MOJOHOST}/api/token/refresh/
Polling Best Practices
Some operations (discovery scans, firmware updates, OS deployments) are asynchronous. When polling for status:
- Start with longer intervals (5-10 seconds) and increase if the operation is still running
- Check the status field rather than re-fetching the full object list
- Use the specific resource URL (e.g.,
/api/node_discovery/scan_range/1/) instead of listing all scan ranges
Error Handling
MOJO uses standard HTTP status codes:
| Code | Meaning | Action |
|---|---|---|
200 |
Success | Process the response |
201 |
Created | Resource was created successfully |
202 |
Accepted | Async operation started — poll for status |
400 |
Bad Request | Check your request body for missing/invalid fields |
401 |
Unauthorized | Token expired or missing — re-authenticate |
403 |
Forbidden | User lacks permission — check pool/group assignments |
404 |
Not Found | Resource doesn't exist — check the ID and endpoint path |
429 |
Rate Limited | Slow down — add delays between requests |
500 |
Server Error | Internal error — check MOJO logs or contact support |
API Training: End-to-End Walkthrough
Dedicated how-to guides
These workflows are also available as standalone how-to guides with additional context:
- Automate Server Lifecycle via API — discover, register, and organize servers
- Manage Firmware Baselines — create baselines, check compliance, remediate
This section walks through a complete, real-world automation scenario from start to finish. Follow along with a live MOJO instance to practice.
Scenario: Discover, Register, and Organize New Servers
You've just racked 10 new Dell PowerEdge servers in Data Center Rack 5. Their BMCs are configured on the 10.50.5.0/24 network with default credentials. You need to discover them, register them in MOJO, and assign them to a "Production" resource pool.
1. Authenticate
export MOJOHOST="https://your-mojo-instance"
export TOKEN=$(curl -s -k -X POST \
-H "Content-Type: application/json" \
-d '{"username": "admin", "password": "your_password"}' \
${MOJOHOST}/api/token/ | jq -r '.access')
# Verify authentication
curl -s -k -H "Authorization: Bearer ${TOKEN}" \
${MOJOHOST}/api/users/me/ | jq '.username'
2. Create an Authentication Profile for BMC Access
# Create the profile
PROFILE_ID=$(curl -s -k -X POST \
-H "Content-Type: application/json" \
-H "Authorization: Bearer ${TOKEN}" \
-d '{"node_classification": "Dell DC Rack 5", "bmc": "redfish"}' \
${MOJOHOST}/api/node_discovery/auth_profile/ | jq -r '.id')
echo "Created auth profile: ${PROFILE_ID}"
# Add BMC credentials
curl -s -k -X POST \
-H "Content-Type: application/json" \
-H "Authorization: Bearer ${TOKEN}" \
-d '{"username": "root", "password": "bmc_password"}' \
${MOJOHOST}/api/node_discovery/auth_profile/${PROFILE_ID}/credentials/
3. Create a Scan Range and Discover
# Create scan range for the new rack
SCAN_ID=$(curl -s -k -X POST \
-H "Content-Type: application/json" \
-H "Authorization: Bearer ${TOKEN}" \
-d '{
"name": "DC Rack 5",
"ip_from": "10.50.5.1",
"ip_to": "10.50.5.254",
"ports": [443]
}' \
${MOJOHOST}/api/node_discovery/scan_range/ | jq -r '.id')
echo "Created scan range: ${SCAN_ID}"
# Start discovery
curl -s -k -X POST \
-H "Content-Type: application/json" \
-H "Authorization: Bearer ${TOKEN}" \
-d "{\"scan_ranges\": [${SCAN_ID}]}" \
${MOJOHOST}/api/node_discovery/run_scan/
4. Wait for Discovery to Complete
# Poll scan status until complete
while true; do
STATUS=$(curl -s -k \
-H "Authorization: Bearer ${TOKEN}" \
${MOJOHOST}/api/node_discovery/scan_range/${SCAN_ID}/ | jq -r '.status')
echo "Scan status: ${STATUS}"
if [ "${STATUS}" != "scanning" ]; then
break
fi
sleep 10
done
5. Register Discovered Nodes
# List discovered (unregistered) nodes
NODES=$(curl -s -k \
-H "Authorization: Bearer ${TOKEN}" \
"${MOJOHOST}/api/node/?status=discovered" | jq -r '.results[] | .id')
echo "Found nodes: ${NODES}"
# Register each node with our auth profile
for NODE_ID in ${NODES}; do
echo "Registering node ${NODE_ID}..."
curl -s -k -X POST \
-H "Content-Type: application/json" \
-H "Authorization: Bearer ${TOKEN}" \
-d "{\"auth_profile\": ${PROFILE_ID}}" \
${MOJOHOST}/api/node/${NODE_ID}/register/
done
6. Create a Pool and Assign Servers
# Create a resource pool
POOL_ID=$(curl -s -k -X POST \
-H "Content-Type: application/json" \
-H "Authorization: Bearer ${TOKEN}" \
-d '{
"name": "Production - Rack 5",
"description": "Dell PowerEdge servers in DC Rack 5",
"group": 1
}' \
${MOJOHOST}/api/pool/ | jq -r '.id')
echo "Created pool: ${POOL_ID}"
# Get list of newly registered server IDs
SERVER_IDS=$(curl -s -k \
-H "Authorization: Bearer ${TOKEN}" \
"${MOJOHOST}/api/server/?search=PowerEdge&ordering=-id&page_size=10" \
| jq '[.results[].id]')
echo "Assigning servers: ${SERVER_IDS}"
# Assign all servers to the pool in one call
curl -s -k -X POST \
-H "Content-Type: application/json" \
-H "Authorization: Bearer ${TOKEN}" \
-d "{\"servers\": ${SERVER_IDS}}" \
${MOJOHOST}/api/pool/${POOL_ID}/assign_servers/
7. Verify the Result
# Check the pool now has our servers
curl -s -k \
    -H "Authorization: Bearer ${TOKEN}" \
${MOJOHOST}/api/pool/${POOL_ID}/ | jq '{name, servers_count, description}'
# List servers in the pool with their details
curl -s -k \
-H "Authorization: Bearer ${TOKEN}" \
"${MOJOHOST}/api/server/?resource_pool=${POOL_ID}" \
| jq '.results[] | {id, name, model, manufacturer, power_state}'
Done!
You've completed a full lifecycle: authentication, credential setup, network discovery, node registration, pool creation, and server assignment — all through the API. This entire workflow can be wrapped in a script or integrated into your automation platform.
Quick Reference: Common Endpoints
| Action | Method | Endpoint |
|---|---|---|
| Authentication | ||
| Get API access token | POST |
/api/token/ |
| Refresh token | POST |
/api/token/refresh/ |
| Node Discovery | ||
| Create scan range | POST |
/api/node_discovery/scan_range/ |
| List scan ranges | GET |
/api/node_discovery/scan_range/ |
| Run discovery scan | POST |
/api/node_discovery/run_scan/ |
| List nodes | GET |
/api/node/ |
| Register a node | POST |
/api/node/{id}/register/ |
| Resource Pools | ||
| List pools | GET |
/api/pool/ |
| Create pool | POST |
/api/pool/ |
| Get pool details | GET |
/api/pool/{id}/ |
| Update pool | PUT |
/api/pool/{id}/ |
| Delete pool | DELETE |
/api/pool/{id}/ |
| Assign servers to pool | POST |
/api/pool/{id}/assign_servers/ |
| Assign switches to pool | POST |
/api/pool/{id}/assign_switches/ |
| Create sub-pool | POST |
/api/pool/{id}/create_sub_pool/ |
| Remove servers from pool | POST |
/api/server/remove_from_pool/ |
| Servers | ||
| List servers | GET |
/api/server/ |
| Get server details | GET |
/api/server/{id}/ |
| Update server | PATCH |
/api/server/{id}/ |
| Server processors | GET |
/api/server/{id}/processors/ |
| Server ethernet interfaces | GET |
/api/server/{id}/ethernet_interfaces/ |
| Server storage | GET |
/api/server/{id}/storages/ |
| Server firmware inventory | GET |
/api/server/{id}/firmwares/ |
| Firmware | ||
| List firmware binaries | GET |
/api/firmware/ |
| Get firmware binary | GET |
/api/firmware/{id}/ |
| Firmware Baselines | ||
| List baselines | GET |
/api/firmware_baseline/ |
| Create baseline | POST |
/api/firmware_baseline/ |
| Get baseline | GET |
/api/firmware_baseline/{id}/ |
| Update baseline | PATCH |
/api/firmware_baseline/{id}/ |
| Delete baseline | DELETE |
/api/firmware_baseline/{id}/ |
| Check compliance (all) | GET |
/api/firmware_baseline/{id}/compliance/ |
| Check compliance (server) | GET |
/api/firmware_baseline/{id}/compliance/?server={id} |
| Check compliance (pool) | GET |
/api/firmware_baseline/{id}/compliance/?pool={id} |
| Remediate (baseline) | POST |
/api/requests/firmware_baseline_update/ |
| Update single firmware | POST |
/api/requests/firmware_update/ |
| Auth Profiles | ||
| List profiles | GET |
/api/node_discovery/auth_profile/ |
| Create profile | POST |
/api/node_discovery/auth_profile/ |
| List profile credentials | GET |
/api/node_discovery/auth_profile/{id}/credentials/ |
| Add credential | POST |
/api/node_discovery/auth_profile/{id}/credentials/ |
Query Parameters Reference
| Parameter | Description | Example |
|---|---|---|
search |
Full-text search across searchable fields | ?search=PowerEdge |
ordering |
Sort results (prefix - for descending) |
?ordering=-name |
page |
Page number for pagination | ?page=2 |
page_size |
Results per page (max 1000) | ?page_size=50 |
resource_pool |
Filter servers by pool ID | ?resource_pool=1 |
power_state |
Filter servers by power state | ?power_state=On |
status |
Filter nodes/scans by status | ?status=discovered |